Saturday, March 04, 2006

File Search Tool -- Super Finder (version 1.5.1 build 1)


Click Here to View Video

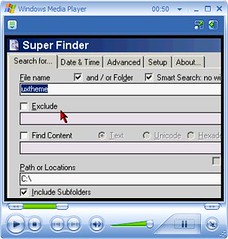
Super Finder is a really good replacement for the Windows built-in search tool. It allows you to search by file name, folder name or certain text in a file. There is an option where you can exclude files from your results list by file extensions or by the full or partial name. The results list after you do a search has a right-click contextual menu that is the same as right clicking on a file in your file manager.

I also use Copernic which I have reviewed previously on my site but its main usefulness lies in its ability to search the content of text files. Copernic cannot search for system files. An example of what I am talking about occurred while I was writing my previous review, I wanted to find the file “uxtheme.dll” that is used in visual styles. Copernic won’t work for a search like this but Super Finder works perfectly.

Although Super Finder is intended to be launched directly to your desktop from a short cut, I have found it to be the perfect complement to the Xplorer2 Lite file manager that I reviewed previously. Xplorer2 has a “Find” option but it defaults to the Windows built-in search tool. The Windows file search tool is really slow and the user interface is not as clean as Super Finder. I have revised my review of Xplorer2 Lite to provide instructions on how to edit the registry to launch Super Finder when you click on the “Find” button in Xplorer2. My review used to have similar directions to launch Copernic but decided to change it based on my comments in the previous paragraph.

Super Finder uses two dos expressions that will probably be intuitive to most of you. The first is the asterisk which is a symbol (*) commonly found above the "8" key on the keyboard. The asterisk widely is known as a “wild card”. The asterisk represents any group of characters or no characters. For example, when typing in the “File Name” field, the computer would look for any file ending with .txt. If you wanted to search for all file names containing “help”, you would enter *help*.* into the “File Name” field. Super Finder does have a “Smart Search” option so you don’t need to enter asterisks into the “File Name” field. The other dos expression is the question mark (?). It functions in a manner similar to the asterisk. Instead of representing groups of characters, the question mark represents any single character. For example, if you enter sm?th into the “File Name” field, it would retrieve "smith" and "smyth" in the results list.

I have found the author is receptive to bug reports. During the course of reviewing Super Finder, I encountered a minor bug. In order to make the search work properly, I found I had to separate words with a question mark instead of a space when I used the “Smart Search” option. I sent a bug report to the author on 3/4/06. On 3/7/06, I received an e-mail from the author saying the bug had been found and solved that there should be a new release in a few days. On 3/12/06, I received an e-mail from the author that the new released had been published. I have since downloaded the new release and verified the bug had been corrected. I was impressed that the author resolved the bug so quickly. If you find a bug, I encourage you to report it. I reported the bug by going to the Super Finder home page linked below and clicked on “Contact” to find an e-mail address.

The new release not only fixed the bug I mentioned above but also includes the first release of a user guide. In the video that I recorded (see the link to it above), I mentioned that the question mark icon didn’t actually link to anything. Well, it does now! I found the “Advanced Guide” listed in the contents especially helpful, particularly the section that explains the “Setup” tab.

The main reasons I like Super Finder is that it responds quickly to searches and it is easy to use. Those of you that are familiar with freeware might find it curious that I am selecting this program over another popular program called Agent Ransack. To my thinking, Super Finder has an easier to use interface. Agent Ransack has a viewer that shows the content of text files that Super Finder does not have. The problem is that Microsoft Office documents like Word and Excel contain text formatting information that display as gibberish in the file content viewer. Copernic has a very good file viewer that does not show the gibberish and is the tool of choice when searching for text files, including e-mail. If you don’t want to install Copernic, Agent Ransack would be a good choice although it is much slower than Copernic when searching the content of files. I have found that it works best for me to search for files containing text with Copernic and other non-text files with Super Finder.

Super Finder is reportedly compatible with Windows 98, Me, NT 4.x, 2000, XP and 2003 Server and requires no installation. The download consists of a single compressed file, superfinder.zip. When unzipped, a folder named SuperFinder is produced that contains three files, superfinder.lng, superfinder.chm and superfinder.exe. To install it, you simply save the SuperFinder folder and its contents to C:\Program Files. Then, you can follow my directions in my review of Xplorer2 Lite to make the “Find” button open Super Finder. If you want Super Finder to be a stand alone application, you can simply create a short cut to C:\Program Files\SuperFinder\SuperFinder.exe.

Super Finder Home Page

Download Super Finder


Thursday, November 24, 2005

Desktop Visual Styles -- UXTheme Multi-Patcher (Neowin Edition 4.0)


Click Here to View Video that Showcases Two Visual Styles

When I had first gotten Windows XP, I became thrilled with desktop themes. When I found the Neowin freeware patch for Windows XP, I discovered a whole new world of totally cool ways of changing the appearance of my desktop that go far beyond desktop themes. If you like desktop themes, you will love visual styles. The Neowin patch allows you to use styles that others have created that are much like the “Windows XP Style” that is included on the “Appearance” tab of the “Display” option in the “Control Panel”. I created the video above to show you two different visual styles that I installed on my computer.

Windows XP has the ability to use “visual styles” that use a *.msstyles file on your hard drive. Unfortunately, Microsoft didn’t set up Windows XP to allow others to create them. The code name for the “Windows XP style” was "Luna" when XP was developed. If you look in your “C:\WINDOWS\Resources\Themes\Luna” folder, you will find a file called "Luna.msstyles". This is the "skin" that is known as the "Windows XP style". The Neowin patch allows you to install visual styles created by others. I was a little concerned about installing a patch for Windows that was not created by Microsoft (some folks might call this a “hack”). The fact is that Microsoft does not provide visual styles other than the XP style that is included with Windows XP. Since the patch has provisions to restore Windows back to original configuration, I felt more inclined to try it. Another concern I had, was the potential that the patch might contain malware because I was not familiar with the web site where I downloaded the patch. After I installed the patch, I ran my spyware scanners (Ad-Aware, Spybot and Microsoft Antispyware), Trojan scanner (Ewido) and antivirus scanner. All of the scans came up clean so I consider the patch to be safe.

There are other programs that perform similar functions to visual styles, like WindowBlinds, Aston and Style XP, but none of these are free. The Neowin patch is the only freeware method that I have found of being able to use visual styles. Unfortunately, the Neowin patch can only be used on Windows XP and Windows Server 2003.

One thing that is lacking in the patch download is step by step directions on how to install and remove the patch. I’ve written directions that should get you through the installation of the patch; as well as, directions to remove it if you decide to do that.

Installing the Patch

  1. Be sure you are using Windows XP, service pack 1, service pack 2 or Windows Server 2003, service pack 1.
  2. Download UXTheme Multi-Patcher (Neowin Edition) 4.0.
  3. After you download it, you will need to unzip the file (nw_uxpatcher.zip).
  4. After you unzip it, double click on the file “UXTheme Multi-Patcher (Neowin Edition) 4.0.exe” with your file manager.
  5. Click on the “Patch” button.
  6. You will get a message that warns you that you will get a “Windows File Protection” message and to not insert your Windows XP setup CD. Click on “OK”.
  7. On the “Windows File Protection” message, click on “Cancel” and do NOT insert your Windows XP setup CD. (Note that this message may appear behind the message to restart your computer that is discussed on step 9.)
  8. “Windows File Protection” will then ask, “Are you sure you want to keep these unrecognized files versions?” Click on “Yes”.
  9. Now return to the other “Install” message. It will say your computer needs to be restarted. Click on “OK”. Your computer will be restarted.

Restoring Windows Back to the Original Configuration

  1. Using your file manager, double click on the same file that you used to install the patch “UXTheme Multi-Patcher (Neowin Edition) 4.0.exe”.
  2. Click on the “Patch” button.
  3. You will get a message that asks, “…Do you want to restore your uxtheme.dll?” Click on “OK”.
  4. You will then get a question that asks, “Do you want to enable or disable themes service?” Click on the “Enable” button.
  5. You will then get a message that says it is necessary to restart your computer. Click on “OK”. Your computer will then restart with all the original settings restored.

There are many visual styles that can be downloaded from the internet. The file that you download for a visual style usually consists of a *.zip file (or other compressed format like *.rar) which when unzipped contains other files and possibly folders. The download will include a *.msstyles file and possibly a folder named “Shell” that has *.dll files to produce different color options for the style. Visual styles that have only one color will not have the “Shell” folder. Visual styles can specify fonts which the author may include in the download, although you can usually elect to not install them. The author will typically include wallpaper which you can choose to not use. The author may also include “skins” or themes for other programs that match the visual style. I’ve found skins for Rainlender (a calendar programs that opens to the desktop, which is sometimes abbreviated as “Rainy”), WinAmp (a media player), SysMetrix (a clock, weather conditions monitor and CPU monitor) and Y’z Dock (a program launcher).

If you want the short version of how to install a visual style, just unzip the contents of the download file and double click on the *.msstyles file with your file manager. I created an MsStyles folder in my C:\WINDOWS\Resources\Themes folder where I save the unzipped visual style files. After you double click on the *.msstyles file, the “Appearance” tab of the “Display” option in the “Control Panel” will open where you can click on “Apply” to open the style to your desktop. I created a tutorial below that provides more information about how to install a visual style. In the tutorial, I use the xplorer2 lite file manager that I have reviewed on my web site.


Click Here to View the Tutorial on How to Install Visual Styles

You should be aware that if you create an MsStyles folder as I mentioned in the previous paragraph and in the tutorial that your visual styles will not appear in the “Windows and Buttons” dropdown list on the “Appearance” tab of the “Display” option in the “Control Panel”. I just use a file manager to launch a style by double clicking on the *.msstyles file name. If you want them to appear in the dropdown list, you will need to adopt a different folder structure. For the style to appear in the list, the folder name in which it is residing must correspond to the name of the *.msstyles file. For example, “elegant.msstyles” must be in its visual style folder named “elegant” in the correct directory (C:\WINDOWS\Resources\Themes) and it will appear. The path for the file would then be:

C:\WINDOWS\Resources\Themes\elegant\elegant.msstyles

If the visual style has a shell folder, it needs to be in the same “elegant” folder:

C:\WINDOWS\Resources\Themes\elegant\shell

I have found some web sites that have visual styles that you can download:

TSS 2000

GStudio

getskinned.org

skinz.org

SkinBase.org

Deviant Art Web Site

Customize.org

belchfire

CrystalXP

LightStar

winmodify.net (not many recent ones but quite a few old ones)

Wulfert.com (This site intermixes visual styles with skins for WindowBlinds, which is not free)

Some of the web sites that I listed above may say that you need a program called StyleXP by TGTsoft in order to use the style. That is not really true if you have installed the Neowin patch. You can use a search engine to find other web sites where you can download visual styles. I recommend that you not use the web site “http://www.themexp.org” because they bundle their download files with spyware. In fact, you need to be suspicious of any download of a visual style or desktop theme that has an *.exe extension. Visual styles and desktop themes consist of files that require no installation. Downloads that have the *.exe extension may contain spyware. The only exceptions to this are self extracting zip files.

The Neowin patch is compatible with service pack 1 and 2 of Windows XP and Windows Server 2003, service pack 1. The download consists of a single compressed file, nw_uxpatcher.zip. When unzipped, one file is produced, “UXTheme Multi-Patcher (Neowin Edition) 4.0.exe”. Follow the directions above for installation.

Update 12/4/05 – I’ve found that finding and downloading visual styles can be addicting. I’ve downloaded over 120 so far. I’ve added three more sites to the list of sites where you can download visual styles. Some of the sites I list above do have a few downloads with *.exe extensions which might contain spyware but all of the sites do have some downloads with *.zip extensions. I’ve installed the Neowin patch on three Windows XP computers without mishap but there is a different method of installing a similar patch if you have trouble (though I have not tried this method). You can get the modified uxtheme.dll file for SP2 final here and then replace the uxtheme.dll file using replacer.

Update 5/11/08 - If you have trouble getting the multi-patcher to work, I suggest using the tutorial at the following web site:

How-To: Use unsigned themes on Windows XP

If you install SP3 for Windows XP, there are directions to manually replace the uxtheme.dll at the following link. I have also added a link to a uxtheme theme patcher that I haven't tried:

Manually Replace Uxtheme.dll on SP3
SP3 Theme Patcher

UXTheme Multi-Patcher (Neowin Edition 4.0) Home Page

Download the Neowin UXTheme Multi-Patcher

Friday, September 09, 2005

Software Presentation Tool -- CamStudio (version 2.0 -- Last Freeware Version)


Click Here to View Video

If you have been reading my reviews, you may have noticed a progression. I started out by adding screen shots of the programs I review. Then I started adding Macromedia Flash files using Wink (previously reviewed). Now I am adding video files. After I had been using Wink for awhile, I happened to find CamStudio that also does software presentations. Both programs record movies of your computer desktop as you demonstrate a computer program. Both are primarily used to create tutorials on how to use software in a visual presentation. I normally use these programs in a slightly different capacity in that I demonstrate the features of a program without providing directions on how to use it. CamStudio has an advantage over Wink in that it records your voice where Wink does not. It will also record your image from a camera while you are demonstrating a program (although I haven’t used this capability).

I had some difficulty setting up the microphone on my computer. It wasn’t a problem with CamStudio but my own ignorance. I kept getting something that sounded like static in my recordings. The microphone plugs into a pink jack on the back of the CPU. Little did I know that I had two pink jacks! I have a Sound Blaster card which produced the best sound. The jack for it was positioned along the same row of jacks as the ones for my speakers. To resolve the problem, I switched to the pink jack on my Sound Blaster card. The sound improved considerably. Later, I discovered yet another jack that I haven’t tried that is next to my modem line that is labeled “Mic” (although it not pink like the other jacks). Anyway, if you have bad sound quality, try looking for another microphone jack on the back of your CPU.

My first recording using CamStudio was 7 ½ minutes long and a whopping 157 megabytes in size. CamStudio comes with another program called “SWF Producer” that takes the *.avi files produced by the program and converts them to Macromedia Flash *.swf files. After using SWF Producer, my recording ended up being a 35 megabyte Flash file. After adjusting the settings on SWF Producer to produce the smallest possible file, I still ended up with a 30.6 megabyte file. (I found out later that CamStudio has a problem with Flash files that I discuss below). Although the Flash file was considerably smaller than the original *.avi file, it was still much too big for streaming video on the internet. Streaming video files for the internet should be less than 5 megabytes so that your visitors don’t have to wait so long to download the files. At this point, I thought that CamStudio might not work out for me. Then I decided to check out the Free Vlog web site. In their tutorials, they recommend compressing video using Windows Movie Maker. Movie Maker comes with Windows XP service pack 2 and should already be installed on your computer. It is usually opened by clicking on your Windows Start button, selecting “All Programs”, then “Accessories”, then “Entertainment” and then “Windows Movie Maker”. If it is not there, try looking in other options in “All Programs”. Unfortunately, the tutorial provided by Free Vlog is for a version of Movie Maker that I don’t have. I am using version 2.1 but figured out how to use it. I ended up with a video that is 5 megabytes in size which was acceptable for streaming internet video. I decided to create a tutorial on how to use Movie Maker to compress your video. If you don’t use Windows XP, the Free Vlog web site should help you compress your video using other programs. The site also has tutorials on how to do other things as well.


Click Here to View Tutorial on How to Compress Video

Windows Movie Maker will convert the *.avi file produced by CamStudio to a *.wmv file. This is actually a good thing because it is possible to select codecs for *.avi files that visitors to your site may not have (see my review of the K-Lite Mega Codec Pack for an explanation). The *.wmv file type will play fine with the Windows Media Player that comes preinstalled with just about every version of Windows. For this reason, the *.wmv file type is probably a better choice for streaming video for the internet because anyone that has Windows should be able to play it without any problem.

You need to know that CamStudio will allow you to create any size of a screen capture area; however, the video must be in a 4:3 aspect ratio when using Windows Movie Maker. If you use Windows Movie Maker to compress a video that is not 4:3, it will squeeze your video to make a 4:3 shape which will result in distortion of the image. I normally use a 320 x 240 screen capture area in CamStudio. If you want to use a different capture area, just multiply the screen height times 1.333 to get the screen width.

CamStudio includes two different versions of media players though they don’t have all that many features. A feature that I do like is the video will play back automatically after you save the file. Another great feature is “autopan” that I use all the time. It makes the video capture area follow the cursor to wherever it goes during the recording. It is possible to record the entire screen, but the file size of the video will be much larger.

There is a known bug with viewing Flash *.swf videos generated by CamStudio. The video cannot be viewed with Netscape or Firefox. When I tried to view a Flash file using Firefox, I found that audio was produced but there was no video. The same Flash file worked file with Internet Explorer. When a Flash file is created, CamStudio also creates a companion html file. CamStudio’s home page (link below) says the problem is with the companion html file and provides a way to edit it so it works correctly. Instead of using the Flash options, I prefer to compress the *.avi files produced by CamStudio and convert them to *.wmv files using Windows Movie Maker.

Other than this bug, I found CamStudio to be free of problems with one small exception. Screen annotations are saved in a layout to a fixed location on your screen. I would have preferred that the annotations would follow the movements of the screen capture area when using the autopan feature. As it is, you can make a screen annotation appear in a location on your screen that is not even being picked up in your recording. I consider this to be a minor problem that can be overcome by some advanced planning.

The program includes a very good help file that is accessed through the program’s Help menu option. It is very comprehensive. Anyone should be able to read it and understand how to use the program.

If you don’t especially like talking over a microphone, Wink is the software presentation tool for you. Wink also produces much smaller file sizes than CamStudio. Wink produces Flash files of ½ a megabyte in size or less. CamStudio’s files that are usually 4 or 5 megabytes in size after being compressed. I have to admit, however, that I find CamStudio to be more fun to use.

CamStudio is compatible with Windows 95, 98, ME, NT4, 2000 and XP. The download consists of a single compressed file, camstudio.zip. When unzipped, two files are produced, CamStudio20.exe and CamStudioCodec10.zip. Unzipping the latter file produced the files camcodec.inf, camcodec.dll and some text files. Right clicking on the file camcodec.inf and selecting “Install” will install the CamStudio Lossless Codec v1.0 onto your computer. Double click on CamStudio20.exe with your file manager to install the CamStudio program. After installation, the executable for CamStudio is Recorder.exe.

CamStudio Home Page

Download CamStudio

Thursday, September 01, 2005

Trojan and Spyware Tool -- Ewido Security Suite (version 3.5)


Click Here to View Video

I counted the scanners on my computer and found that I actually have five different scanners installed. Three of them are spyware scanners; Spybot, Ad-Aware and Microsoft AntiSpyware. One of them is my virus scanner (one that I have purchased). The final one is Ewido. I installed it mainly because it scans for Trojans. Having five scanners may seem a bit extreme but they are not really that much trouble because all the scanners can be started and run at the same time. I do a scan once a week. When I do it, I launch each program, select the option to perform updates and minimize it. I then do the same thing to each scanner. After performing the updates, I turn off my screensaver clicking on Screen Saver Toggle (reviewed previously), start the scans and leave it alone for about an hour. a screensaver uses system resources which can slow the scans, so I use the Screen Saver Toggle to turn it off easily.

My main purpose behind installing the Ewido scanner is to be able to find Trojan horses. A Trojan horse is a program that infects your computer and allows a hacker to take control of it without you knowing. A Trojan infection allows a third party to remotely access your computer. Technically, a Trojan is not actually a virus so your virus scanner may not detect it. Trojans do not replicate themselves like viruses so you must download them on onto your computer. Typically, they are disguised as something else (which is the basis of the name Trojan). Most people tend to think of Trojans as a virus; however, a virus scanner may catch only some Trojans but not all of them.

I decided to keep Ewido when it found a Trojan on my computer that none of the other scanners found, including my virus scanner. It also scans for spyware. I have found that it often finds spyware cookies for the Firefox web browser that are not picked up by the other scanners. It also has frequent updates to the definition files.

The first two weeks that you use the program, Ewido will have options for real time protection and automatic updates. These options will be disabled after two weeks when the program reverts to the freeware version (which is what I use). The scanner will continue to function identically to the commercial version.

Ewido is compatible with Windows 2000 and XP. The download consists of a single file, ewido-setup.exe, which you double click to install.

Ewido Home Page

Download Ewido

Sunday, August 21, 2005

Video Player with Codecs and Tools -- K-Lite Mega Codec Pack (version 1.37)


Click Here to View Video

After I had gotten my new computer that has Windows XP installed, I decided to download some video from the internet. I found that some of the files didn’t play back properly. The audio portion of the files would play but there was no video. I noticed that the file type that had this problem most often was the *.avi file type. After I had done some searches on the internet and going through a bit of a learning curve, I determined that I didn’t have the codec installed that I needed to play the video. I ended up finding one of the tools that comes with the K-Lite Mega Codec Pack that is called the G-Spot Codec Information Appliance (as best I can tell the name “G-Spot” is derived from the name of the program author, Steve G). With it, I was able to determine the codec that I needed to play back a video. Then I could perform a search on the internet for the codec where I could download and install the codec. I didn’t know about the K-Lite Mega Codec Pack back then but I wished I did. It provides a much simpler alternative in that it already includes most of the popular codecs all in a single package that you install one time. In fact, I would say it includes about 95% of the codecs that you will ever need to play back video. The author also provides regular updates to the codec pack and provides support on a forum that is available on a link from the K-Lite home page.

If you don’t know what a codec is, it is short for "Compressor-Decompressor" or "Coder-Decoder". In order to make video files smaller, all video is compressed in a manner comparable to *.zip files. In order to play the video back, you must have the same the codec that was used to compress the video. Microsoft provides codecs for the media player that comes with Windows, although they don’t provide codecs of other vendors. The *.avi video file type is capable of using numerous codecs that Microsoft does not provide with Windows.

The K-Lite Mega Codec Pack actually has more than just codecs but also comes with the following:

Media Player Classic

Video player similar in appearance to version 6.4 of the Windows Media Player but not affiliated with Microsoft.

BSPlayer

Video player named after the first author, Boris; hence, Boris Software Player.

Real Alternative

Allows you to play RealMedia files (usually *.rm or *.ram) without having to install the official Real player.

QuickTime Alternative

Allows you to play QuickTime files (usually *.mov) without having to install the official QuickTime player.

Sherlock

Tells you what codecs you have installed on your computer.

GSpot Codec Information Appliance

A tool that can tell you exactly which codecs are needed to play a certain video file. This is very helpful when you have trouble playing a video file.

Numerous codecs

The download has most of the codecs you will need, including the popular Divx and Xvid.

One of the nice things about the download is that you can select items that you want to install. I tried the BSPlayer but didn’t like it and it does not work with the Real and QuickTime Alternatives. However, the Media Player Classic does work with the Real and QuickTime Alternatives and is my favorite media player for video. I have it set as my default player for all video. If you don’t install it, you won’t be able to watch streaming video with the Real Alternative. The Real player has some obnoxious characteristics that are explained well on another site. RealMedia files are quite popular for streaming video on the internet, so I consider the Real Alternative to be quite valuable. The QuickTime player is a good player and doesn’t have the obnoxious characteristics of Real player but I decided to uninstall it because I prefer having as few media players as possible. With the combination of Media Player Classic, Real Alternative, QuickTime Alternative and the codecs in the download, you can eliminate the need for the three players, Divx, Real and QuickTime. To my surprise, the Media Player Classic will even play back Macromedia Flash (*.swf) files. You will however, still need to keep the Windows Media Player that Microsoft provides with Windows. It will play a few file types that Media Player Classic won’t.

In addition to the versatility of the Media Player Classic, one of the main things I like about it is that when you select full screen during playback, the player controls disappear. The controls appear when you move your cursor to the bottom of the screen. Pushing the “Esc” button while in full screen mode returns the player to the small version and pauses it. The visual appearance of the player is very much like the version 6.4 of the Windows Media Player that Microsoft used to provide with Windows; however, the Media Player Classic is not affiliated with Microsoft. It is interesting to note that all Windows distributions still include the old Windows Media Player v6.4. You can run it by clicking Start, Run and entering MPLAYER2.EXE. I think you will find that the Media Player Classic is actually a much better media player than the old Windows Media Player v6.4.

What is the future of streaming video on the internet? Will the internet take over TV? I think internet television will require much more bandwidth than even today’s high speed cable modem. Certainly a step toward internet TV is the development of “Wi-Fi” wireless internet connections. From what I have read, today's Wi-Fi systems are limited to about 100 megabits of data a second, a rate that will support no more than a single high-definition television video stream in the home. If Wi-Fi systems catch on, I would expect developments that would increase bandwidth. It is apparent that CBS News sees a future in streaming video. They have dramatically increased their streaming video content recently. To watch the video, just click on the little TV cameras on their site but expect to be required to watch an advertisement when the video starts.

The K-Lite Mega Codec Pack documentation does not say what systems that it runs under but I read reports that it is compatible with Windows 98, ME, 2000 and XP. The download consists of a single file, klmcodec136.exe, which you double click to install.

K-Lite Mega Codec Pack Home Page

Download K-Lite Mega Codec Pack